Monday, July 25, 2016

1st Pull from the Inspiration & Challenge Jar

After getting the jar together I had to give it a try.  This is what came out....

Gotta say, these are not things I work with all that much.  So I guess that means the jar's working.  I had some ideas without needing the orange challenge strip so I opted to ignore it.  And a BABY theme???!  I almost never make baby cards. After I thought about it a bit though, I realized I actually have someone I can send it to soon so that's like icing on the cupcake!

For the colored pencil technique I opted to color a stamp.  When playing around with my pencils a while back I found that you can soften them with baby oil.  How cool is that??!  Here's one of the stamped images I colored and what it looks like softened.


This is the finished product.  Not my favorite card ever but I think I can live with it.  It has banners and brads.  Used colored pencils and is a baby theme so I successfully completed the challenge.


If you're feeling up to it, I'd love to see your take on my challenge pull.  Post links so I can go check it out.  If you do play along, the "blog hop" challenge can use any challenge from any blog you follow.  Please make sure to give links for that too.  I'd love to find more blogs to check out.

Have a fabu day!

P.S.  My pics are not very pretty.  I'd like to find a photography class to take to be able to use my camera and do better quickly.  If you know of any, please let me know about them.

Sunday, July 24, 2016

Inspiration & Challenge Jar

I finally did it.  This is something that's been banging around in my head for a really long time now but I've just never taken the time to do it.  Part of it was figuring out HOW I wanted to do it and also the idea of making all the lists....  Well, even to a professional list maker such as myself, it was a little daunting.  I have no doubt I've missed or forgotten something.  But the good news is that I can always keep adding to the lists and the jar.  To make sure I don't duplicate stuff I went ahead and typed it all up.  I'm hoping that'll save some hassle down the road.

The idea is to have a large variety of ideas or products or challenge themes all mixed up in a jar and pull out 3-5 slips.  Then you have to create a card using just the items or concepts on the slips.  This should be a really neat way to get out of a rut or challenge myself.  Which are two situations I find myself in much to often lately.

I decided to color code my slips.  This will make it easier when I'm pulling them out.  Pink for techniques to use, yellow for products or items to use, orange for challenges and green for theme.  This way I'll pull one green, and however many of the others I want.  If I only want one challenge I'll pull one orange but maybe multiple of the yellow to use several products.

I have one of those super sized pickle jars from ages ago. Until a few minutes ago it had all kinds of strings of beads in it.  Now it's got all kinds of cool 1" by 4 1/4" strips of paper with writing on them in it.  They could go into a smaller jar for sure.  Or any other kind of receptacle for that matter.  It might even be kind of cool to put each color into it's own jar.  But I like the idea of being able to put my hand in and swirl them all around until I pick one.

I made sure to make extras of each color so it'll be fast and easy to add more as ideas come to me.   Inspiration & Challenge Jar list    I'm not thrilled with the way Google Docs changed this up but it's still at least got all the items noted.

I think I'll probably also decorate the jar at some point but for now, I'm pretty happy to have finally gotten this much done.  If you've got suggestions for the list or easy decorating ideas send them along!

Have a fab day!


Tuesday, January 12, 2016

Getting Punny.... Part 1

I had a whole other blog post planned but have decided to save it for another day.  :)

Instead I wanted to share the punny valentine's I've made recently.  They'll all be up in my Etsy shop but I wanted to be able to giggle over them with friends.  Since there are so many I'm going to break them up into different "parts".  Hope you get a giggle out of them too.

This group features the sentiment "You're so deer to me."  I had to pair it with the adorable Woodland Deer from Spellbinders.  I die cut, embossed and stenciled it and in the top card I added Sugar Sparkly Fluff to the white on the deer's tail and belly.  It's also been featured with several other die cuts - seems like these woodland animals MUST have that little bit of grass with them.  And I just had to use that Woodgrain die cut - so stinkin' cool!  The whole herd was lifted off the page with foam dots to give them extra emphasis.


These next two were inspired by an adorable card I found on Pinterest.  Here's the link to her original post.  I didn't want to copy it exactly so I let the inspiration percolate just a bit.  And of course song lyrics and movie quotes came to me!  With that I knew exactly what I wanted to do.  Die cut heart shapes and then die cut the die cut hearts (say that 3 times fast!) with a puzzle piece die.  Wah-lla!  Any one able to name the movie and song or artist these two reference?
This last one isn't very punny but I really dig it.  The original card has been pinned for a long time and there's so much about it I like.  The white on white of the front, the circles with hearts cut out and then popped up, the simplicity but totally cool style of it.  For this version, I have NO doubt there will be others!, I opted to focus on the white on white and the circle theme.  It's difficult to tell in this scan (I'm working on getting my photo booth set up and it can't happen soon enough!) but the white interlocking circles are actually popped up off of the card front.  A stamp and a die cut heart finish it off.
Hope you like these.  And if you've got any favorite puns share them!  I'm always looking for inspiration!


Tuesday, December 29, 2015

Sharing my craft room

One of my favorite time wasters  things to do is to look at all the things on Pinterest. One of my favorite things to look for/at are craft rooms and all the fun, creative, unique storage and organizing options and designs.

Long before there even WAS a Pinterest, I was doing the same thing in all the scrappy magazines.  I even created a layout about it.  Anyone remember this ad?
I already had a mental list of a number of things that were mandatory as you can see from my list.  It's interesting how so many of those things actually stayed consistent over time.  
Here's the whole layout.
I even heard about a contest for a room makeover and decided to try to enter it. And being the crafty soul that I am, I figured that an album would be much better as an entry than a simple essay.  And I'm sure it would have been.  If I'd've finished it and sent it in.

I'm not much of a country fan but I gotta say there may just be something to Garth Brooks' assertion that "sometimes God's greatest gift is unanswered prayers".  If I'd've finished that album it would have been sent in to the contest and I wouldn't have it as one of my favorite mini albums today.  It documents all the things I wanted and then, how I accomplished them.  Much better than having some celeb designer with no real clue about crafting doing it.  Here's a link to the album - My Favorite Room.
 
For one time in my very impatient life, I managed to do prep work.  I still have the folder with my lists, pictures and hand drawn plans.  If you'd like a good giggle, click on the link and you can check 'em out.  Despite this proof that prep work pays off, I still don't do well getting it done.  And the proof that it pays off is that the vast majority of my room is still just like it was originally planned out.  There have been a few adjustments or changes but not a huge amount considering this was done in December 2007.

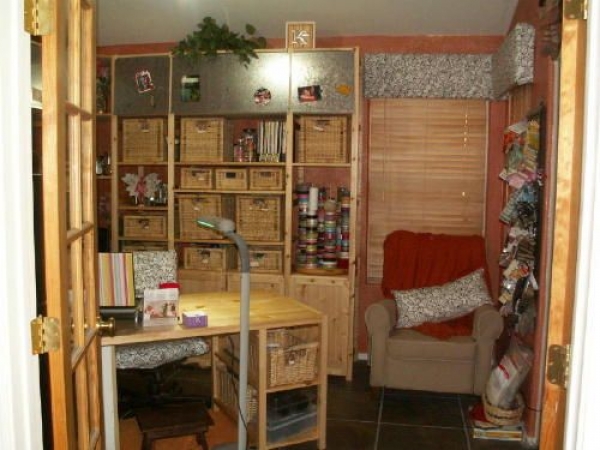
Here are a few of my favorite spots in my room with commentary.

This is a look into the room, circa 2007, from the French doors.  I was so delighted to be able to include a comfy chair for Mel to sit in.  Little did I know it actually ended up having Harley in it much more than any homo sapien's behind.  You can just see the ribbon turn table that I made and additional ribbon on the pegboard.  The desk is now straight, facing forward.  It was just easier to get around once I moved it.
This looks into the corner.  The top doors are magnet and are pretty well completely covered by now with all kinds of things that make me happy.  And my poor desk has never, no exaggeration, been this clean since.  One of the coolest updates has happened to the desk.  Mel added a drop leaf to the end. This has been a HUGE help when I've got a lot of stuff I want to play with and need more room. Best of all, I can put it down when I don't want it taking up the extra space. The link shows it in white but it's actually a similar color to the desk.  Super win!
Here's an updated view with the drop leaf extended.  You can also see the super cool round, spinning organizer I got from Harbor Freight.  I highly recommend it.  A little bit of a pain to put together but well worth the time and effort once you're done.  You can also see the framed photo of Harley in his chair looking down on me and Davis.

You can also see a few of the small changes that have happened.  I added dowel ribbon storage to the side of the unit near the chair and a super cute new polka dot rug.
My die cut center is soooooooo awesome!  Having a space to keep all my dies in one place with my machine, heaven!  After changing how I do things this past year I decided to change it slightly.  Here's the original, right across from my desk
And now once it was moved to the right side wall.  Much easier and quicker for me.  Plus an added bonus is it's literally right next to my scrap storage, which you can just see peeking out from underneath the printer.  This past year I also finally combined all of my dies together.  I used to keep my Spellbinders separate from all the other companies. But I finally figured out that if I'm searching for something specific, like a flower, that it's a whole lot easier to look in ONE spot than two.  The top shelf has all my shape dies in Crop N Style PSB binders.  Those things are rarer than hen's teeth!  So if you've got some you want to part with let me know!!!  The bottom shelf has my alphabet dies and embossing folders.  You can see that I left my ink pads on the wall but moved my stamps with the unit that moved.  This was for several reasons, the biggest one was that I tend to use my stamp pads more than my stamps so keeping them closer to hand will make grabbing them that much faster and easier.

This little spot has actually changed the most.  I've added a shelf and more baskets, as you can see to the left in the photo above.  One of my favorite things is the wine bottle pen holders.  So much storage taking up so little space and leaving so much space to put plenty under them.  My big perpetual calendar has been retired.  Or more aptly, hidden. Hopefully one day I'll be able to find a spot for it again.

If you'd like to see more pictures from my office, follow this link.  I've got folders breaking down specific things as far as my room and organization go.  

Do you have an album or layout with images from your craft room?  Or favorite pins for rooms or clever storage and organization solutions?  Please share then with me.  I'm always looking for new ways to waste time, rather new inspiration.  :)


Sunday, December 20, 2015

Sharing some creations

When I was at my last job I created the office birthday cards.  Very often I would search Pinterest for ideas and LOVED pinning images or projects that sparked me and then put my twist on them as I used products from the company to accomplish it.

Here are a few of the Pinterest pins and my take on them with commentary.  I apologize for the photos.  Oddly, I usually forgot to take any pictures of the cards and only remembered when they came across my desk to sign.

This really was one of my very favorites.  The pops of color and simplicity work perfectly together. My version used Spellbinders Birds on a Wire & Sentiments 3 dies

                                       
     Here's the  original post 
                                                                             
This next one was really fun and so stinkin' easy!  I used Sentiments 3 again and pulled out an older set, the Classic Ric Rac Edgeablity dies.  Part of why it was so easy is that I had 2 of the Ric Rac die and used painters tape to hold them together and down to my paper.  That made die cutting plenty of chevrons fast and simple.

Here's the original pin.

I really loved trying to figure out how to create this last card.  My version features Papertrey Ink Friendship Jar Fillers set and the Summer Fillers set.  The really neat details on this card aren't immediately noticeable - the 3 little colored dots are actually perler beads that I melted - here's how - and the large scalloped frame required creative die cutting.  I'll show that at the end. So easy and a great way to get more out of your dies.

This is the original post 

Since I didn't have a scallop die large enough to create the opening size I wanted I had to create my own.  Here's how!

- Cut mat to your finished size to make it easier to line everything up.  This will also help avoid trying to cut narrow margins around your finished "negative" frame.
- Cut your first scallop rectangle with the bottom lined up where you want it.  This photo shows the original big scallop rectangles cut from my cardstock
- Reset the scallop die so that you're actually only cutting a portion of the shape
- Whalla!  You can now make negative frames any size you need! This will work well with squares and rectangles especially.  If they've got a design feature, like the big scallops here, it's super easy to line up for the second time through your machine.  Make sure to keep the pieces you've die cut as they'll work perfectly for another project down the road.


What are some of your favorite pins or Pinterest successes?

Monday, December 14, 2015

Jumping in again....

I knew that blogging would be a challenge for me but I never expected all of the things that would happen to distract me from blogging on a regular basis.  Just a few of the things that have kept me busy since I last blogged (8/13):

- I made a team (10/13) and now bout regularly.  If you haven't come out to see it, you really should.  I'm on the Brawlaz but am working my tail off to be put on a state level team.  www.azrollerderby.com
- our nephew now lives with us.  Mel's mom passed away (11/13) and he was the last rugrat she had guardianship over.
- Bret has started the fire academy.  And since finished it and gone again to refresh before taking the various tests.
- Bret also tested extremely well for the Phoenix Fire Dept and got into the first and second round of interviews with them.
- He also moved out and has an apartment in Tempe with a friend.  A bittersweet event for sure.  But mom and dad hooked him up with all the kitchen gear they'd need.
- I've changed departments and jobs at work and am a million times happier.  And was let go (8/15) which makes me sad.
- we have a 4th dog (1/14).  Though he's so damn small he's more of a rat or a cat but he def has big dog attitude.
- we lost Harley (3/15) and Pablo (8/15) and are down to 2 dogs and a turtle.
- I got surprised with an adorable new car (8/13).  Her name is Rosy and I really dig her.
- And my mom has visited (9/14)and returned to Texas.  And has moved here permanently as of 6/15
- I broke my right ankle (3/15) and had to have surgery.  This one has a plate and 11 pins.  Since the doc put my first (and logo) tat back together perfectly I'm not not giving him a hard time about the missing 12th screw so that it would have matched my left side.

And now I'm looking forward to another big adventure.  Since I'm no longer gainfully employed, and am having a challenging time finding a new position, I want to combine my love for creating with helping people, which I also love to do.  A seed was planted by a friend of mine for a business opportunity and I'm hoping to explore it.  As well as devote some time and energy to my Etsy site.

So I hope you'll follow along, send ideas/suggestions/comments/funny jokes.

Have a lovely day!

Tuesday, August 13, 2013

A New & Exciting Adventure....

My mama always said (yes, you MUST read that in your best Forrest Gump voice) that when a door closes, a window opens.  As I've lived longer (I may be admitting my age now but I'm not going to say I've grown up or that I've gotten older) I find this to be more and more true.  You just never know when one chapter ends what will happen in the next.

Deciding to stop teaching crafting classes was really hard.  I'd been doing it for so long.  And it was so much a part of "me".  The me I knew, the me that I showed to the world and the me that made up my life.  Letting go of that was hard.  But also kind of freeing.  Now, I had all kinds of new choices to make.  New possibilities to consider.  New ways of creating and sharing to think about.

At RollerCon ( a week long roller derby convention for those of you not into derby) my window didn't just open, it slammed up and announced itself.  I met with Em Dash, co-founder of derbylife, and over really bad loud music and the clanging of slot machines, agreed to become an editor for the site.  

Since getting into crafting some of my other, former interests had fallen by the wayside.  They were still there, they just didn't get much attention or weren't often used.  But to now be able to write.  To talk to people and get their story.  To be able to share that with other people.  I'd forgotten that "writing" voice I used to have.  I'm working at getting back in touch with that part of me.  Percolating ideas and opening sentences.  Thinking about how I want to approach a topic or subject.  Being able to combine a creative outlet with my now, 2 year love affair with roller derby.  The possibilities are wide open.  And I'm so excited to start charging down this less traveled path.

My blog will continue to have my crafty pursuits showcased.  I'll never be able to stop that.  It's as essential as breathing and skating to me.  I'll also try to tell the occasional interesting, humorous or at least funny story about my life and the characters that are in it.  But you'll also be seeing questions and topics I'd like feedback about.  If it pertains to you, please respond.  If it doesn't, I hope it's at least interesting and you learn about something you didn't know about before.  And no matter what, I hope you'll read those things I write for derbylife because they'll be personal.  I don't know how else to approach things.

And for those of you that have listened to my stories, listened to me vent and complain and cry because I wasn't making the progress I wanted to - I PASSED MY ASSESSMENTS LAST NIGHT!!! That means I can start scrimmaging and hitting and PLAYING derby.  It also means I'm 6 weeks closer than I was to getting onto a team.  I'll be expecting all of you to come watch me once I'm on that team and actually bouting in public.